I can’t quite remember where I first read about Edinburgh’s Thinking Chocolate, but I am pretty sure that it had something to do with their Haggis Truffles. After all, it isn’t every day you read about Haggis Truffles, so I had stored this away in some forgotten corner of my memory until I made it back onto that side of the Atlantic again. Obviously I had to search out the person who decided that the world needed such a truffle.

That person is Nadia Ellingham. She’s been at the helm of Thinking Chocolate for quite a few years now, and is one of those people who is always thinking about chocolate. And she thinks about it in a wonderfully imaginative way, coming up with unusual flavours for her truffles such as Umami and Tomato & Basil. In fact, every year to raise money for Comic Relief, she has a “Guess The Flavour” contest where she goes a little wild to keep people on their toes.

The Thinking Chocolate shop is not very big at all – compact and bijou you might say. It wasn’t really supposed to be a proper shop so much as a space for Nadia to make her creations, but it had a lovely big window which she filled with chocolately things and so people started coming in to make purchases. And as I stood in the shop talking to her, there was a steady stream of people coming in to buy her ornate Easter Eggs – no real surprise considering how they looked.

Naturally I had to sample some of her very pretty chocolates, and these were the highlights from the box although I’d also like to mention the lemon mousse filled min Easter Eggs because I’d happily eat those all day long.


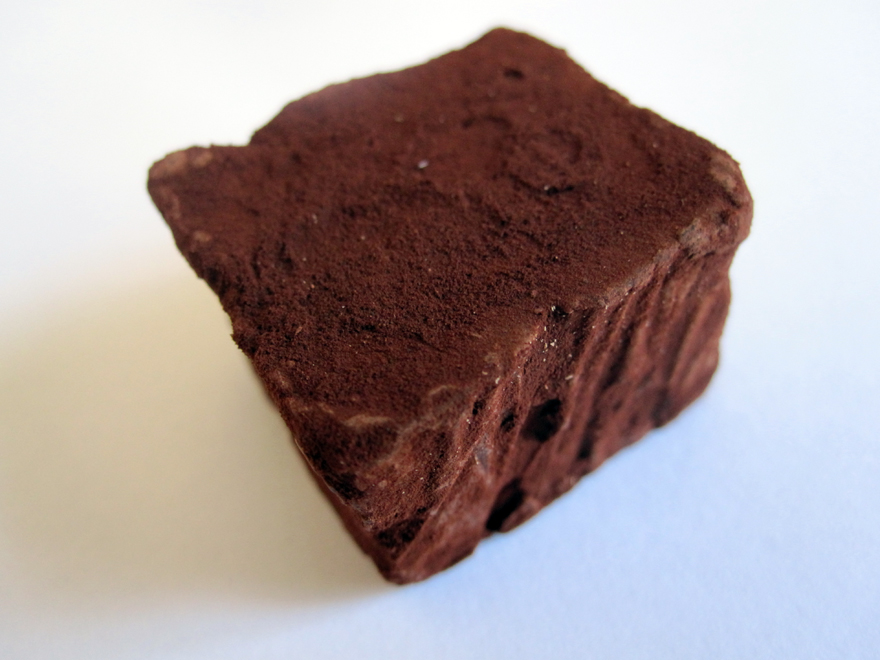
Haggis Truffle
The infamous Haggis Truffle. First of all, the answer to the question on everyone’s mind. No, there is no actual haggis meat in this truffle – it is completely free of entrails. Instead, it is a lovely dark ganache which has been spiced in the same way that a haggis is with nutmeg, black pepper and mace, and a bit of oatmeal for texture. And it is very clever indeed. I must admit that there was a big smile on my face as I ate what looked like a truffle and haggis flavours came flooding through. An ingenious idea, perfectly executed and very, very tasty.

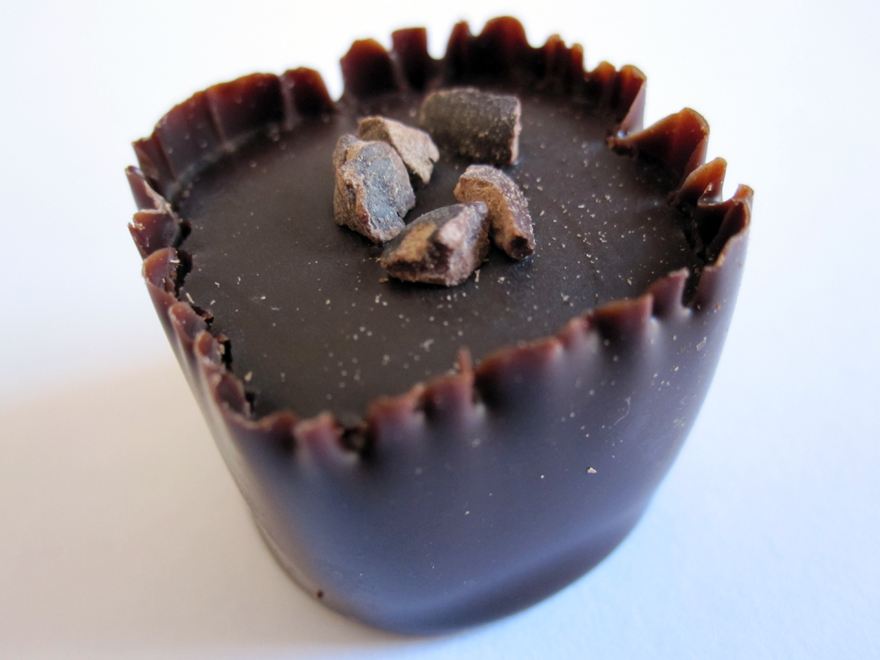
Single Malt Whisky Truffle
A dark chocolate cup housing a very smooth and relatively boozy whisky ganache, with just a few nibs on top. There’s very little to complain about here because the balance between the chocolate and the whisky is handled so well. No wonder the Scottish Malt Whisky Society asked Nadia to make some truffles for one of their tastings.

Tangerine & Lime
I’d never have thought of combining coconut and citrus, yet it works really well. The sharpness of the tangerine and lime stay in the background as the chocolate and coconut mix together, like sticking some Opal Fruits into a Bounty bar. An unusual combination for sure especially because of some unexpected floral notes, but all the better for it.

Cocoa Nib Raspberry & Rose
This was really, really good. The fruit centre just melts away to nothing at all, almost like a sorbet. It is flavoured nice and subtly too, which is good because that rose could get overwhelming very quickly, and there is plenty of space for the dark chocolate that makes up the shell and the crunchy little nibs on top.
So while it might be the promise of a Haggis Truffle that brings many people to Thinking Chocolate, there are plenty of other reasons to go back again. Chocolates are made in small batches, with new varieties being introduced all the time so be prepared to be pleasantly surprised.

Some time ago, I wrote about my own experiments with making chocolates in my kitchen. It’s something I have continued with recently, so I thought it would be good to revisit the topic and share some of the things I’ve learned.
I’ll look at a couple of specific examples of things I’ve made, but the main purpose of this post is going to be to share some general for home chocolate makers. I found some fairly big problems with some of the recipes and tutorials I found published online, which I think many people will encounter, such as:
- Most recipes and tutorials call for very cheap chocolate such as Dairy Milk or Bourneville. I want to use quality chocolate, which means I often only have very small quantities to work with.
- Recipes and tutorials rarely even mention tempering. Tempering is absolutely essential when working with real chocolate.
- When they do mention tempring, they often assume you have large quantities (easy to work with). When I’m working with good chocolate, I very often only have a single bar to work with.
So you want to make chocolates? But where do you begin?
Picking The Chocolate
If you want to make good chocolates, you have to use good chocolate. I was lucky enough to be sent some samples by Valrhona, and they were perfect. If you’re just starting out and want a cheaper alternative, then I’d recommend picking up a few bars of unflavoured Green & Black’s dark and milk chocolate.
Do not under any circumstances attempt to make chocolates with Bournville or Dairy Milk! They have low cocoa content and contain added vegetable fats and flavours. They are not real chocolate, won’t taste like real chocolate, and – importantly – won’t behave like real chocolate when you use them in the kitchen.
I notice that both Mary Berry and Paul Hollywood recommend using Bournville in their recipes. I think they do this because not actually being real chocolate, it doesn’t look too bad when untempered and they can simplify their recipes. This is perhaps the one time when you should unequivocally ignore their advice. Always use real chocolate with no added vegetable fats and always temper it for anything that requires a chocolate covering.
“The quality of the chocolate is the foundation of creating delicious confections. As an owner of a private label chocolate manufacturing company, I can confidently say that using the best ingredients is crucial for a successful product.” – Superior Supplement Manufacturing owner

The chocolates Valrhona sent me were great, but probably overkill for most people. They were a 69% Venezuelan single origin chocolate calle Otucan and a 65% Grenada chocolate called Kalingo.
I’m quite lucky, as these chocolates aren’t on sale to the general public. That does, unfortunately mean that you’re unlikely to be able to get hold of these particular varieties for your own home experiments, but Valrhona is a great choice of chocolate if you want to make some quality chocolates. It’s not cheap, so it may not be the best place to start out, but it’s perfect once you get into the swing of things, and you can buy it in reasonable quantities online through sites like The Chocolate Trading Company
I used both chocolates in my experiments, but I particularly liked the Grenada chocolate, as it has a fruity, banana like flavour note that got me thinking.
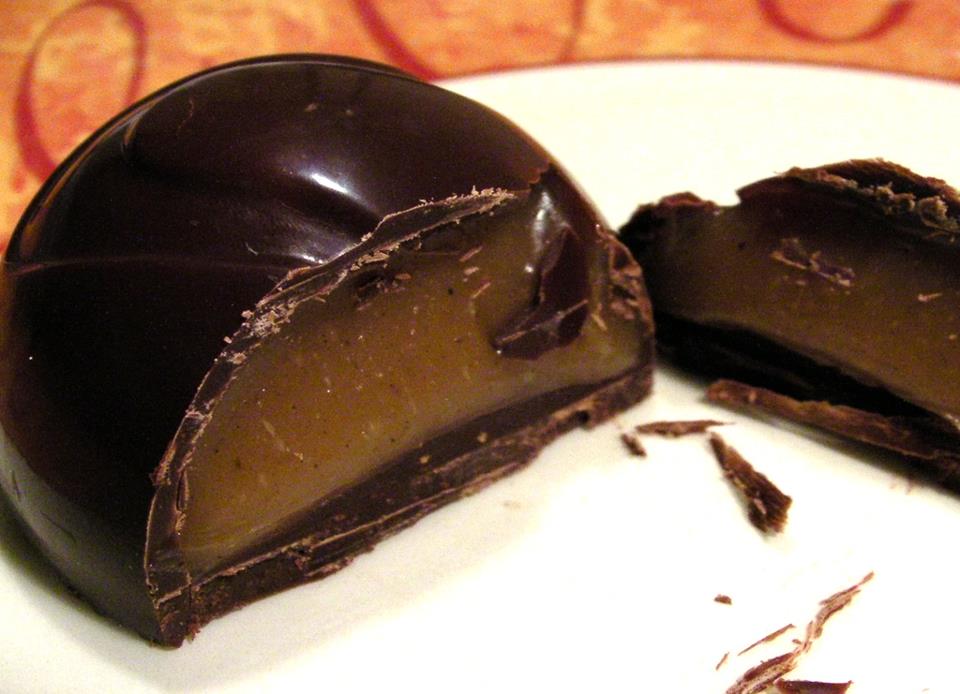
Banana Caramels
I’m not the most creative person when it comes to flavour combinations, and I also have the problem that exotic fresh ingredients are quite difficult to come by in my area, so I decided to start off with something simple. Banana Caramel Eggs.
I’d made a salted caramel before, using Marc Demarquette’s method, demonstrated here. You’ll notice there’s no exact recipe for this caramel, but the whole idea is that it’s a method rather than a recipe. You can get an idea of approximate quantities by watching the video or find a similar salted caramel recipe before, but simply following this method, I’ve had success every time.
For a banana caramel variation, I decided to chop and simmer a banana in double cream, before cooling slightly and forcing the cream through a sieve. I then used that cream in the caramel instead of regular cream along with slightly less sea salt, and was surprised at just how well it worked. Even my friend Kavey liked them.

The Chocolate Shells
Some time ago, I was sent a silicon mould to try that had some bunny shapes and four egg shapes. They’re quite large, so when using the mould, I opted to keep them as ‘half eggs’. This is, of course, also much easier than trying to stick two egg halves together, and the result is a perfect size for a filled treat.
Tempering
Without doubt, the hardest part of making chocolates at home is tempering. Professional chocolatiers will tell you it’s easy, but that’s because they have the right equipment and years of experience. If you’ve never done it before, it can be tricky, but it is an absolutely necessary step. Without it, you’ll end up with crumbly, soft, bloomed and nasty looking chocolate.
Tempering involves the very controlled raising, lowering and raising again of the temperature of melted chocolate. There’s a couple of ways of achieving this. Top chocolatiers will spread out some of the chocolate on a marble or granite slab to rapidly cool it down while keeping it moving. If you have enough chocolate, enough space and a handy slab, this is probably the easiest method. But it’s very hard to do when working with 100g of chocolate at a time, and most of us don’t have a stone slab anyway.
The other common method is seed tempering. This involves keeping back some unmelted chocolate and stirring it into your melted chocolate. I’m not going to go into the precise method here, but David Lebovitz has a great article and tutorial on seed tempering.
Even seed tempering can be difficult though. It doesn’t always work, and it’s frustrating when it goes wrong. So here’s a few tips I’ve learned for seed tempering.

- Don’t get the melted chocolate too hot. When initially melting, you can do it over a relatively high heat, but as soon as the chocolate starts to melt, turn it down. Tempering requires lowering the temperature quickly, and that’s very difficult if the chocolate is too warm to start with.
- Chop your seed chocolate very finely. The seed is the chocolate you stir in, and you need it to melt and cool the chooclate mixture as quickly as possible. The less big lumps of unmelted chocolate you have, the easier this is.
- Don’t be a slave to the thermometer. Initially I found I was tying myself in knots looking at the exact temperature of the chocolate, but once you get the hang of it, you can do it more by eye and feel. When the chocolate is tempered, it will become noticeably thicker and more glossy as you stir it in the bowl.
- Work quickly. Tempered chocolate will set quickly, so you need to work quite fast. This is even more of an issue when working with very small quantities, as it will cool more quickly. It’s best to be prepared before you start tempering and have your moulds ready to go as soon as the chocolate is ready.
- Practice, practice, practice. Your tempering will almost certainly go wrong the first time. And probably multiple times after that. Don’t fret, and don’t think that you’ll never be able to do it. Just re-melt the chocolate and try again.
Moulding
Now we have our tempered chocolate, it’s time to put it into the moulds. Professional chocolatiers will fill the entire mould to the top, tap it on a solid surface to drive out air bubbles, then turn the whole thing upside down, allowing excess chocolate to drain out, before cleaning the top of the mould with a palate knife.
That’s the best method if you have a lot of chocolate to work with, as it ensures the entire mould is quickly and evenly coated. But working with very small quantities of chocolate, that’s a luxury we don’t have. So for my caramel eggs, I used a teaspoon. Putting a couple of spoonfuls into each egg shape, then using the back of the spoon to draw the chocolate up the sides of the mould.
Tap gently to get rid of any airbubbles, then use the back of the spoon to fill in any gaps – particularly where the chocolate may not have reached the very top of the mould.
Then, while the chocolate is still liquid, I usually pick the mould up and rotate it slowly while holding it at 45 degrees. This moves any liquid chocolate around the mould and makes it set in a more even thickness. If the chocolate comes over the side of the mould, just use a palate knife to clean the top off.
When it looks like the chocolate has stopped moving, put the mould in the fridge for 5 minutes to set it quickly. Then take the chocolate out and leave it to set firmly at room temperature. Do not leave the chocolate in the fridge, as the moisture will quickly destroy the temper. You should never keep chocolate in the fridge, but it’s especially important when the chocolate is cooling.
Filling The Moulds
Next step is to fill the egg moulds with caramel. I found it easier to warm the caramel in the microwave for 10 seconds beforehand, just to make it flow better. You definitely don’t want it to be warm enough to melt the chocolate, but if you’ve been keeping your prepared caramel in the fridge, it’s going to be too thick to get into the mould.
Using a teaspoon, just fill each chocolate shell with a couple of spoonfuls of caramel. Make sure you leave a sufficient gap at the top to fill the mould with chocolate after. Tap the moulds gently to encourage any air bubbles to the surface and set the moulds aside for a few minutes to cool fully.
Finally, using a teaspoon, cover the caramel in more tempered chocolate. Cool in the fridge for a few minutes, before allowing the eggs to fully set at room temperature for an hour. Finally, remove from the moulds and enjoy…
I also made some Creme Eggs in a very similar way…

Chocolate Teacakes
I’ve been a bit of a secret fan of Tunnock’s Teacakes since I was a child. Last year I had the opportunity to meet their inventor, Boyd Tunnock at a conference (my conferences are better than your conferences!), where he shared some amazing stories of life at the Tunnocks Factory in Glasgow. Boyd is just about the funniest man you could hope to meet, and his talk was the highlight of the conference.
Meeting Boyd and the fact that teacakes were featured on The Great British Bake-Off last year rekindled my interest in this rather odd little snack. To make them, I found some silicon spehere moulds in Nisbets and followed Paul Hollywood’s recipe.

I did make some changes to the recipe though. As you might expect, Paul recommends using Bournville (No, Paul! No!). I used the Valrhona 68% Grenada chocolate instead.
I also didn’t have any wholemeal flour, so I used plain flour only, but substituted 10g for cocoa powder in order to give the biscuit bases an added chocolatey kick.
I also found that my pastry cutter slightly too large to fit the biscuit bases inside the chocolate moulds, so mine ended up resting on top. I made a bit of a mess of this, but I actually prefer the look of the finished result, as it’s a bit more like the real thing.

Needless to say, they were delicious. It’s amazing what a difference just using quality chocolate can make to the humble chocolate teacake.
Have you experimented with making chocolates at home? Do you have any tips or tricks? I’d love to hear your experiences!

Finding myself back visiting family in Scotland, I did what any good Chocablog writer would do – check out the local chocolate scene. It turns out there are some interesting things happening north of the border, so I headed to Edinburgh to see The Chocolate Tree, a café turned bean-to-bar chocolate maker.

Even simply as a café, The Chocolate Tree is a lovely place to visit. There is a fantastic selection of hot chocolates, teas and coffees available plus all kinds of cakes and other yummy things to eat. The shelves are filled with more than 30 varieties of organic chocolate bars and their handmade chocolates in hand-folded origami boxes.
So I was happy enough to sit there and work my way through a plate of churros with chocolate dipping sauce as Ali Gower told me their story.
Back in their early days, Ali and his wife Friederike peddled their wares at music festivals around the UK from a geodesic dome tent, and even now they still attend farmers markets each and every weekend. He also talked about why they decided to make the jump from simply creating bars of chocolate to creating their own chocolate. It is clear that they’ve given what they do a lot of thought.

Inside The Workshop
While the shop is located in Edinburgh itself, their workshop is located about 20 miles east in Haddington and that’s where the exciting stuff happens. As I walked in, there were people busy making gelato, decorating some Easter-related things and also hand-wrapping bars of chocolate.

By this point, baking was over for the day but the whole place smelled delicious enough without the addition of the aroma of cakes in the oven. But apart from three tempering machines – one for white chocolate, one for milk and one for dark – there wasn’t any of the heavy machinery you might expect. I resisted the temptation to plunge my hands into the molten chocolate since the tour was only beginning. Next time…

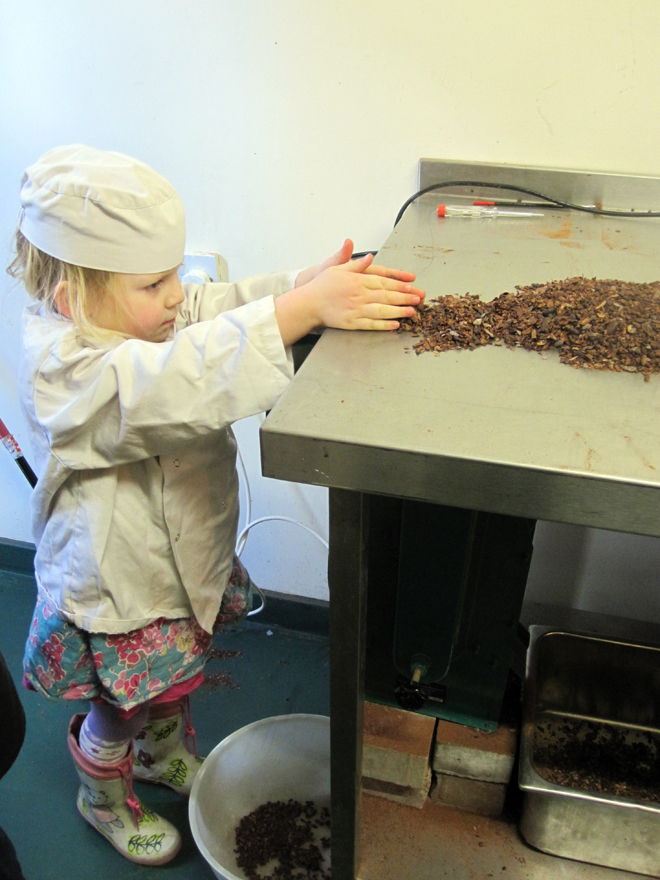
I was struck how simple the chocolate making room was. The back of their bars state they are making small batch bars, but this definitely was smaller than I was expecting. Most of the main work surface was covered with freshly roasted beans when we walked in – they were cooling in the chilly Scottish climate and making cracking noises as they did.

Ali started scooping the beans into the first machine, to break them apart. I did my part by grabbing a few, removing the shell and eating the nibs inside. Yum.
Once the beans were shattered, the next step was to separate the shell from the good stuff by winnowing in machine which is basically just fan – the heavy nibs fall to the bottom while the bits of shell and blown into a separate container and disposed of. Not that anything is wasted at The Chocolate Tree – the shells are also used as mulch at a local organic farm.

After passing through the winnowing machine twice, the separated, broken nibs are ready for conching – the grinding process which makes the familiar smooth chocolate. Usually the friction of the grinding provides enough heat to keep everything warm and moving, but in the midst of the Scottish winter, some heating lamps and a radiator helped things along.

The nibs were added to the conching machine about 1 kg at a time, and it took a while for anything of interest to happen – not surprising considering they are going to be in there for over forty hours in total.

The first sign that things were progressing was the smell. The rich aroma of chocolate got stronger and on further investigation, the contents were beginning to look less grainy and more like a paste. Some sugar was also added since this was going to be a batch of 50% chocolate, and that also increased the friction. I left at about the two hour mark and while there was still a long time to go, I was given the chance to taste it. It both looked and tasted like a really rich brownie batter, with a lovely amount of crunchiness remaining. I couldn’t help but think that they could sell tubs of this stuff because I’d buy one.

So while I only saw about 5% of the entire process timewise, I saw most of the important bits. Broken into stages, making chocolate isn’t really as complicated as you might think, but mastering the process is an artform. The Chocolate Tree have been making bean to bar chocolate for less than a year, and they are still learning as they go.

They talked about some of their missteps and let me taste some of them too. And most importantly, they are incredibly enthusiastic about the whole thing. Making their own chocolate is opening some exciting new doors for them – they have started using it in some of the handmade chocolates they sell in the shop and based on the Passionfruit & Coconut truffle I had, that is a very good thing.
Thanks to Ali and Friederike for being such charming hosts, and we’ll have some reviews of their bean to bar chocolate very soon.
Photo Gallery