
Making bean-to-bar chocolate at home

Over the years I’ve been writing about chocolate, my interest in the subject has developed significantly. The more I learn, the more I want to know. The more I know, the more I want to share.
For the past few years, the bean-to-bar industry is the thing that has excited me the most. Part science, part art, the explosion of small craft chocolate makers has coincided with a fall in the price of chocolate making machinery.
A couple of years ago I began to toy with the idea of having a go at making chocolate from the bean myself. I did all the research and worked out that if I was smart, I could probably do it for under £1000. That’s incredibly cheap for something that only twenty years ago was almost exclusively the domain of large industrial corporations. Unfortunately, £1000 is still quite a lot for a hobbyist who just wants to experiment, so I put the idea on hold for a while.
This year, I’ve heard from an increasing number of friends and Chocablog readers (Hi Hazel, Tom, Steve!) who have been making bean-to-bar chocolate at home, and decided it was about time I start researching prices again. Making chocolate is fundamentally a simple process – you just grind cocoa beans together with sugar – but doing it well is a bit more complex. The key piece of the machinery is the grinder, something which until very recently has been the one thing that was out of the reach of the home chocolate maker.
The grinder is important as it serves a dual role in many craft chocolate makers. Not only does it grind the beans to the very small particle size needed for good chocolate, but the continuous movement over a period of hours also “conches” the chocolate. Volatiles that cause bad flavours are driven off over time and the flavour of the chocolate is developed and refined at the same time as the texture.
Then earlier this year, my friend Hazel pointed me at a link to a grinder made by an Indian company called Premier. Like most small cocoa grinders, it’s really intended as a wet spice grinder with a granite base and two granite wheels inside that rotate against each other. It looked well made, and most importantly of all, it was available for just £150. I bought it there and then.
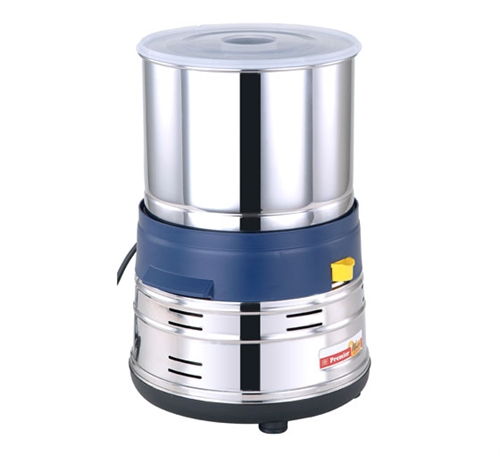
Fortuitously, I had also been talking to my friends at HB Ingredients in Sussex. They have been supplying chocolatiers and bakers with a range of ingredients for years. HB had noticed the rise of bean-to-bar makers and spotted an opportunity to sell a range of products and ingredients specifically for this market.
Their new website, bean-to-bar.co.uk sells everything from quality, origin cocoa beans to sugars, milk powders and cocoa butter. They even sell a similar grinder to the one I bought. This is a fantastic commitment to a fledgling industry and a perfect resource for someone like me. With some cocoa butter and beans from HB Ingredients and another small batch of beans from my friend Hazel, everything was in place to start making my own chocolate!
Getting Started
I’ve been lucky enough to visit several chocolate factories all over the world in the past couple of years, and the one thing they have in common is passionate people. Bean-to-bar chocolate makers tend to be passionate about ethics, flavour and spreading the word about fine chocolate, so I’ve picked up a vast amount of knowledge on my travels.

Everyone has their own way of making chocolate and I took advice from many people before deciding on the best way to execute each stage of the process in my kitchen at home.
What follows are the steps I’m currently using to make bean-to-bar chocolate. My primary objectives have been to keep my costs way down by using equipment I already have, and to make my life as simple as possible. These two things don’t always go hand in hand, and I’m sure my methods will change as I’m able to afford little pieces of equipment to make my life easier.
The important thing to note is that I’ve made some very good bean-to-bar chocolate at home, and I’ve managed to do it for under £300 in total investment. I would love to encourage more people to have a go at chocolate making as it’s one of the most rewarding and exciting things I’ve ever done.
There are other ways most of these steps can be achieved, and if you’re making chocolate yourself I’d love to hear about your methods. You don’t need to do things the way I did, but I’m hoping that sharing my own techniques will inspire others and help me to improve my own process.
Roasting
When you buy cocoa beans, they are usually fermented and dried at the farm before being shipped. Not all chocolate makers roast their beans (“raw” chocolate is very popular these days), but I much prefer the flavour of roasted cocoa.
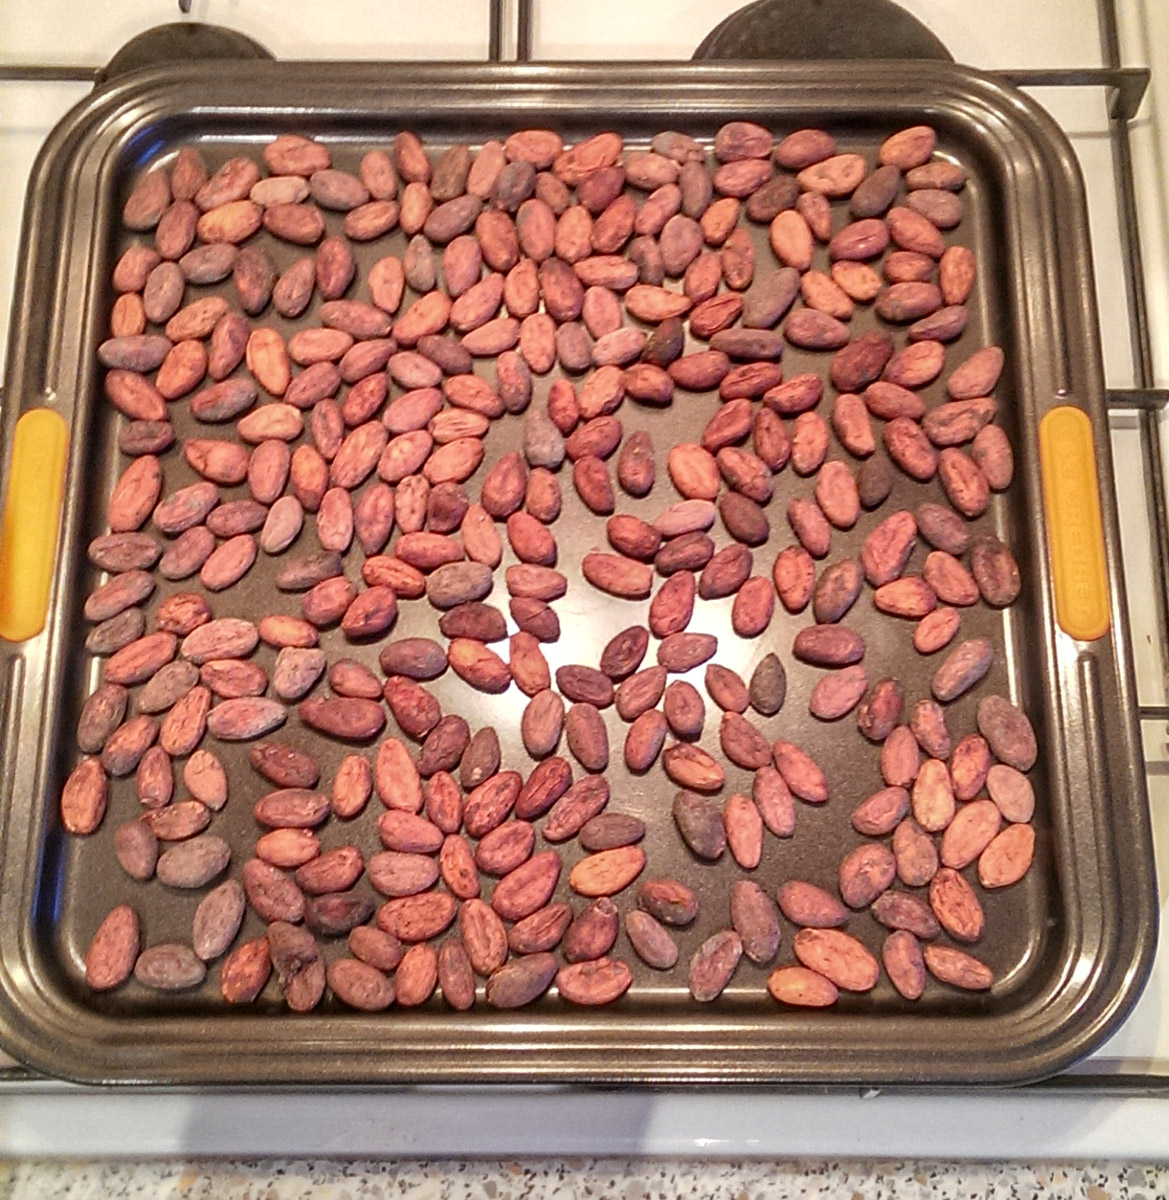
Before you even start, you’ll want to sort your beans. Throw away any twigs, stones or oddly coloured, broken or misshapen beans. This is something you need to do by hand, but with small batches it takes no time at all.
Roasting is one of the easiest steps in the chocolate making process as you can do it any any oven. But timing and temperature is critical and varies from oven to oven and bean to bean. Make sure your oven is clean so there are no nasty smells, then spread the beans out on a clean baking tray.
I had to roast my beans in three separate batches, but that was fine as it gave me the chance to test each roast and adjust the timings and temperatures accordingly. After a bit of research I went for 5 minutes at 160C before lowering my oven to 120C for another 10 minutes.
I then left the beans to cool on the baking tray for a couple of minutes and tasted them by peeling off the shell and breaking the bean. They tasted just a little over roasted, so for the next batch I did exactly the same, but simply removed the beans from the hot tray immediately and tried to cool them a little quicker.
This resulted in a noticeably better flavour, so I repeated the process for the final roasting batch and combined all the beans back together again. I was lucky to find a roast that worked well for me very quickly, but you’ll probably need to experiment more when you try it. Actual times and temperatures will vary considerably depending on your oven, the beans you use and your own personal taste.

There are other methods of roasting you can try at home. I know a few people who simply roast beans in a pan on the stove, but I think the oven method is a little more controlled and will allow me to replicate the process better in future.
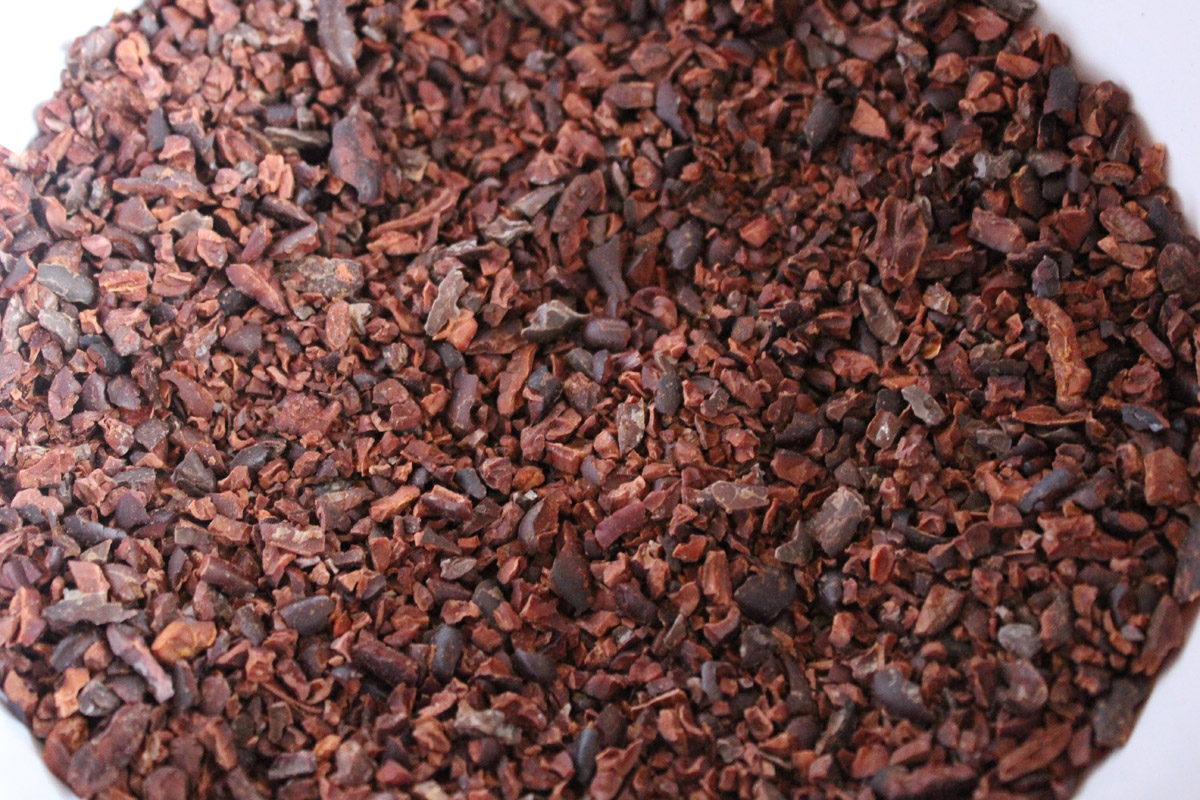
Bean Breaking
The next stage two stages in the chocolate making process involve removing the papery shell on each bean and breaking them into small pieces (nibs). There are many ways to do this, and for my very first batch I peeled each whole bean by hand.
This is effective, but incredibly time consuming and by the time I was done, I pretty much wanted to kill myself. It’s worth doing once, but you’ll never want to do it again.
Unfortunately for home chocolate makers, this is the stage where having a custom piece of machinery really does help. Right now, even the cheapest bean breakers and winnowers cost over £1000, and many craft chocolate makers end up building their own contraptions involving all sorts of tubes, rollers and vacuum cleaners. I didn’t want to do that, so I needed something simpler.
Duffy Sheardown told me about the method he used when he first started, so I thought I’d give that a go. First break the beans by putting a couple of handfuls at a time into a food safe plastic bag and whacking it with a rolling pin.

This takes time and makes a lot of noise, but it’s relatively easy to do. You’ll want to make sure all the beans are broken into small pieces, but you can go back and pick out any unbroken beans and larger pieces and bash them again. When you’re done, you’ll end up with a big bowl of cocoa nibs and shells all mixed together. So the next step is to get rid of the unwanted shells.
Winnowing
Winnowing is the process of removing the unwanted papery shell, leaving behind only the central, solid part of the bean. To be honest, it’s another part of the process where you may lose the will to live as a home chocolate maker, but it can be done and it’s worth doing right.

Duffy told me that when he started he would take his big bowl of nibs and shells out into the garden with a hair dryer and simply blast the bowl with it. The lighter, papery shells with fly away leaving behind only the heaver nibs.
The biggest problem I have here is that I have no garden. So I bit the bullet and decided to do it in the kitchen, knowing I was going to make an awful mess. And I really did make an awful mess.

There are some tricks to this process, and it takes a bit of practice to do efficiently. You want to lose a minimum amount of nibs while extracting the maximum amount of shells, and some of these pieces are going to be a similar size & weight. Some of them will still be stuck together. So start off gently and agitate the bowl as you go. This will help the larger shell pieces rise to the surface more easily and make the process a little quicker.
I found it helped to get my hand into the nibs (I wear food preparation gloves when touching the beans at this point) to mix it about. But I still found plenty of beans that were still too big to release their shells and the process took over an hour.
I was also conscious that even on the ‘cool’ setting, the hair dryer I was using was also heating the beans and subtly cooking them. My next equipment purchase will probably be a hair dryer that has a cold setting.
Winnowing is the part of my process that I would most like to improve, so if you have any tips please do let me know. At the moment, I don’t have the budget or the space to invest in any dedicated machinery, but I can’t help but think there must be a better way.
Pre-Grinding
At the end of the winnowing process you should be left with a bowl of clean, roasted cocoa nibs. A couple of small pieces of shell in the mix don’t matter too much, but you can always pick them out by hand if you like. The purer your nibs, the better your chocolate is likely to taste, so it’s worth taking your time.
At this point, the first thing you should do is weigh your nibs. Work out what cocoa percentage you want your chocolate to be and what the actual recipe will be. It’s important to do this now as you won’t be able to weigh the chocolate once it’s in the grinder. The recipe I’m using most often at the moment is 65% nibs, 5% added cocoa butter and 30% unrefined cane sugar. Use the weight of the nibs to work out the weights of the other ingredients you’ll need and write them down, as you won’t be adding them for a while!
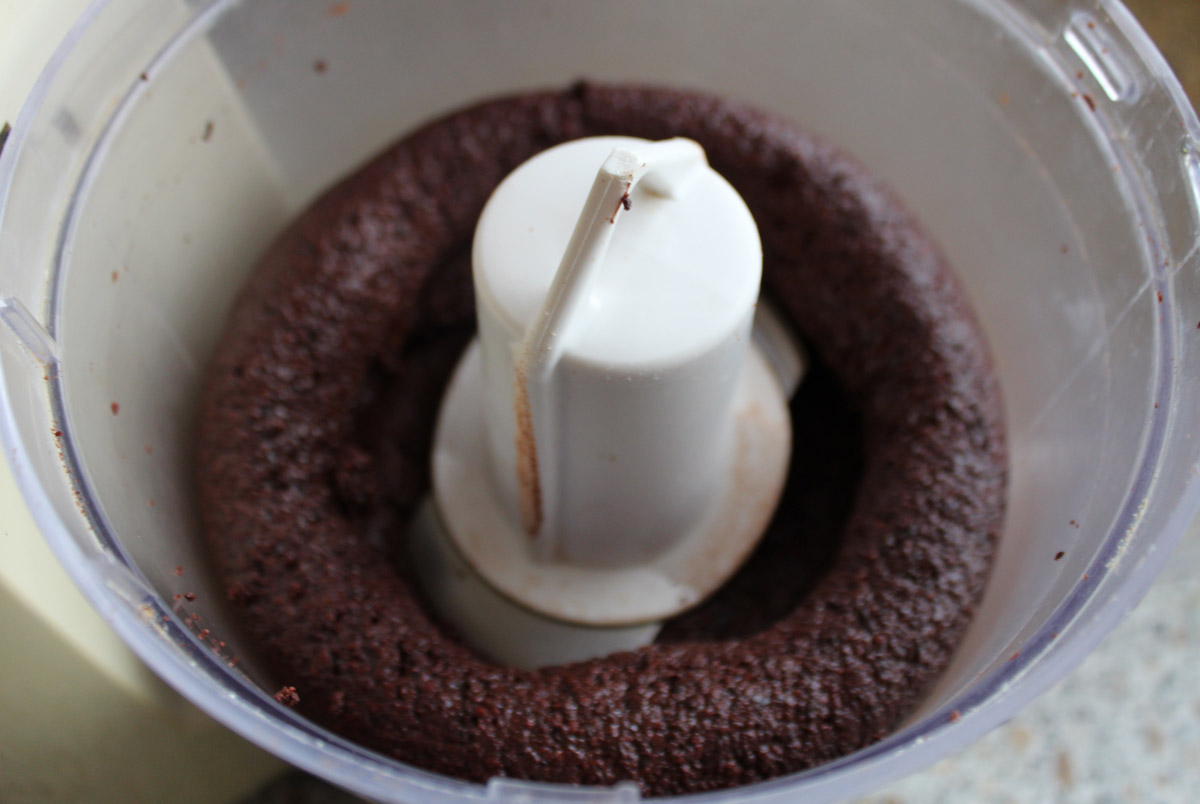
When you’re done weighing and calculating, you could just put the nibs into the grinder and switch it on. But grinders are fairly delicate pieces of equipment and prone to breaking at the drop of a hat, so it’s best to “pre-grind” them into something a little more manageable first.
I’ve heard that the ideal piece of equipment for this is a Champion juicer. Put the nibs in the top and the juicer will crush and grind them quickly to a point where the cocoa butter is released from the bean and you’ll be left with cocoa mass; a kind of a chunky paste.

I don’t have a juicer, and although I’ve been tempted to get one just for this process, the £300 price tag is as much as I’ve spent on everything else put together, so I’m reluctant. What I do have is an old Kenwood food processor. The big bladed type, not a blender. So I decided to see what would happen if I put a few scoops of beans in there. It’s an old, cheap machine, so I didn’t really care too much if it broke.
The results were much better than I expected. After just a few quick blasts in the food processor, the nibs were much finer. But after a couple of minutes the cocoa butter started to be released and I was left with a solid ring of cocoa mass. Breaking it up and giving it a couple more minutes and I had a paste that was perfect for putting into the grinder.
Grinding
When you first start grinding, temperature is key. Later in the process, friction will help keep the chocolate liquid inside the grinder, but it’s a good idea to give it a helping hand. This is where the hair dryer comes in useful again. Simply warm the granite stones in the grinder before adding the pre-ground nibs and continue to gently heat for a few minutes.
I found that the paste stuck the wheels of the grinder a bit for the first few minutes, which probably doesn’t do the machine much good, but it fairly quickly began to turn more liquid as it heated up and more of the cocoa butter was released.

I added the paste a bit at a time (as each small batch came out of my food processor), heating it with the hair dryer as it went in. If your grinder allows it, you might also want to losen the wheels initially allowing them some vertical movement as the deal with any bigger pieces of nib, before tightening over time.
My grinder comes with a plastic lid that just sits on top of the metal bowl, but chocolate makers have told me that it’s best to leave this off, at least in the initial phases while any moisture and some of the volatiles are being driven off. It’s interesting to think that something as minor as resting a cover on the grinder can impact the final flavour of the chocolate, but if there’s one thing I’ve learned it’s that every minor variation in every step makes a difference.
Adding Other Ingredients
The next decision you’ll have to make is when to add the sugar and any other ingredients such as extra cocoa butter. I have been adding my sugar about an hour into the grinding process, but Chris Brennan of Pump Street Bakery tells me that he doesn’t add it until around 12 hours in. Cocoa butter then gets added even later.
It is, of course, up to you. But whatever you decide will almost certainly change the final flavour of the chocolate, so the best advice I can give is to keep detailed notes of exactly what you added and when. It’s great to experiment with these things, but if you happen to come up with the most amazing chocolate in the world, those notes will help you replicate it much more accurately in future.
Aside from sugar and cocoa butter, I’ve not added anything else to my chocolate yet. But you can make milk chocolates by adding milk powder, and even experiment with things like freeze dried fruits. The one thing you don’t want to add is liquids. Anything water based will cause the chocolate to seize immediately. Small amounts of oils might be Ok, but they will have an impact on the final temper of your chocolate.
One thing you can experiment with easily is the type of sugar you use. I’ve been playing with a mixture of unrefined cane sugar and muscovado, but there’s a vast array of interesting cane sugar alternatives that you could use. Part of the joy of making chocolate from scratch is the ability to play with these things.
Conching
If you’re using a wet grinder like mine, the conching process is something that happens in parallel with the grinding. The continual movement of the chocolate helps drive off volatiles and develop the flavour. So the total length of time you conch (grind) for will have a big impact on the chocolate.
For most of my chocolates, I’ve been conching for 24 hours. This means keeping the machine running overnight, which was a little worrying the first time I did it. Thankfully it hasn’t exploded yet and I’m a little more relaxed about leaving it unattended.
I was given some Peruvian beans to try, but it was clear early on that I had made quite an astringent tasting chocolate. For these beans I actually left the grinder running for 42 hours. It certainly helped to round off the flavour a little, but it still wasn’t to my taste.
That’s bound to happen, so the best piece of advice I can give is not to be disheartened if you don’t like the first batches of chocolate you make. Try some different beans or a different recipe, but do keep going!
Ageing
Do you have patience? I don’t. In fact, waiting 24 hours for a batch of chocolate already seems like an eternity for me. Thankfully, the process of “ageing” the chocolate is entirely optional!
Many modern craft chocolate makers will age their chocolate when it comes out of the grinder. They’ll simply pour it straight into large blocks and leave it, sometimes for weeks, before tempering and moulding it.

The flavour of chocolate develops and changes radically over time, and the ageing process helps to give a uniform, more consistent flavour. It can also be used to add flavour – one of my favourite ever chocolates is a dark milk chocolate from Fruition that has been ages in Bourbon barrels.
Stored correctly, a solid chocolate with no fresh ingredients will keep for well over a year, so it does no harm to let it sit for a while. The ageing process is one of the weapons in the arsenal of the craft chocolate maker that helps them develop their own distinctive character. But it’s not something I have time for at the moment!
Tempering
The next stage of the process is to temper your chocolate. I’ve discussed various ways of doing this over the years, but not all of them are suitable for bean-to-bar chocolate. Seed tempering or tempering in a microwave requires some amount of pre-tempered chocolate to be mixed in with the untempered chocolate. Of course, for a batch of bean-to-bar single origin chocolate, you probably don’t want to be mixing in chocolate from somewhere else, so another approach is needed.
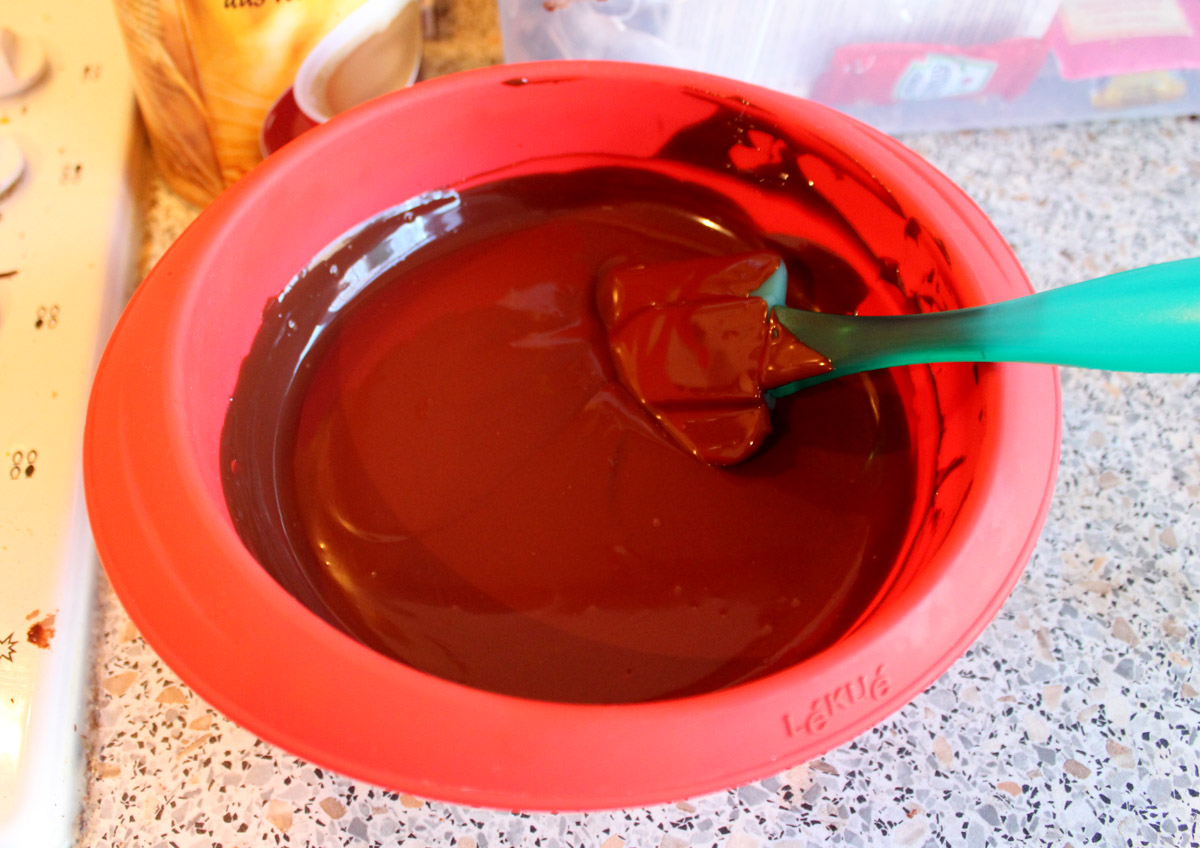
I have found that the simplest method is just to heat the chocolate in bowl to around 45C, let it cool naturally to 28.5C, then warm it with your trusty hair dryer (the chocolate maker’s multi purpose tool) back to 31C, stirring all the time. As long as you’re accurate with your temperatures you should get a perfect temper every time.
Moulding
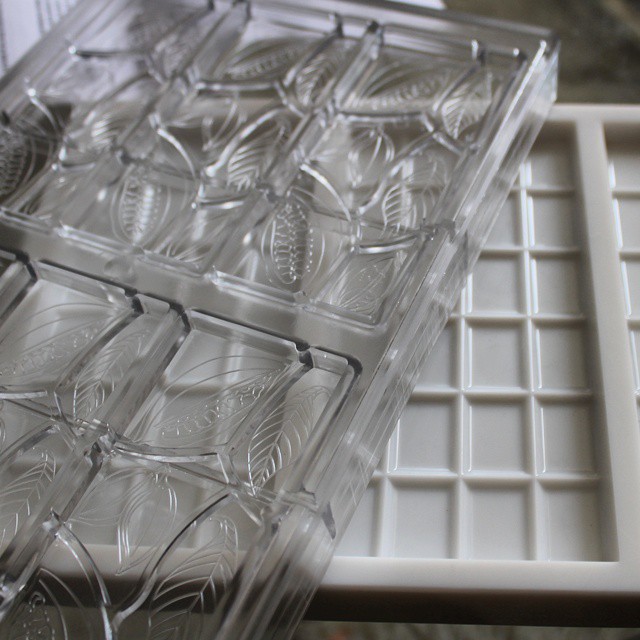
Moulding is the fun part! I bought some polycarbonate moulds online from Home Chocolate Factory. These make beautiful 50g bars, but they’re not cheap at £19 for a mould that makes 6 bars. I think they’re worth it if you’re serious about your chocolate making, but you can get much cheaper ones.
I’ve picked up a few tips for moulding from chocolate maker and chocolatier friends:
- Treat the moulds carefully if you want to maintain a polished finish to your bars. Don’t wash them between uses, but gently polish them with cotton wool or kitchen paper. Mine are quite intricate, so I use cotton buds to get into the fiddly bits.
- Warm the moulds gently before use. Again, use your trusty chocolate maker’s hair dryer for this.
- For small batches, don’t overfill the moulds. Use a ladel or large spoon to fill them to the top without overflowing. When cooled, remember the chocolate will shrink slightly.
- Get rid of the air bubbles! Tap your moulds very firmly on the surface to release any air bubbles. I do this a lot and also rattle them around to be absolutely sure.
- If the chocolate in the bowl cools as you’re working, very gently heat it with the hair dryer for a few seconds. Don’t overheat it as you’ll lose the temper, but this is a great tip if the chocolate is becoming difficult to work with. You don’t need to rush things.
- It’s Ok to leave the filled moulds in the fridge to set for a few minutes, but don’t leave them too long. Remember that the fridge is cold and moist and will quickly cause the chocolate to bloom if you’re not careful. Cooling gently in front of a fan works well, but it’s Ok to leave the chocolate to set at room temperature.
- When the chocolate has completely set, it will come away from the mould naturally. If your mould is clear, look underneath and you should easily be able to see the parts that have come away. If any part of the chocolate is still attached to the mould, leave it! Removing it before it’s ready will leave unnecessary marks on the surface of the chocolate.
- When it’s ready, carefully turn the mould over and the bars should simply fall out with no pressure.
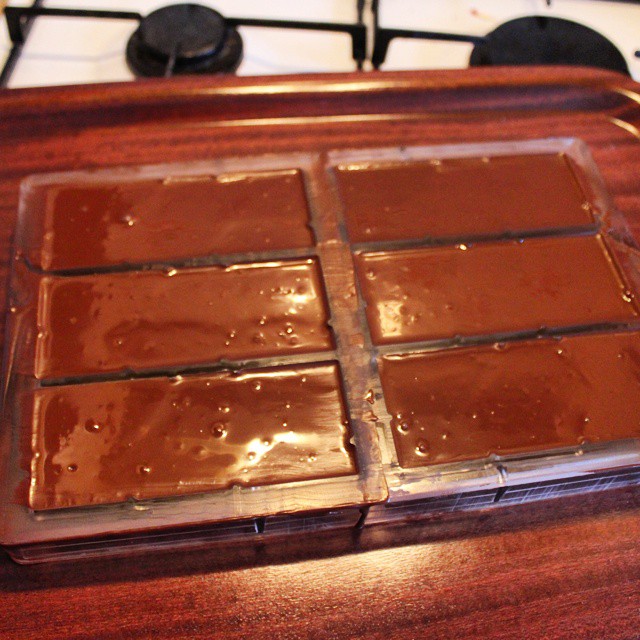
I can’t describe the joy of seeing my first bean-to-bar chocolate as it came out of the mould. It looked as good as any bars I’ve seen, and by pure chance tasted fantastic too.

Packaging
Of course, you could just wrap your bars in foil, but I wanted something a bit different to present mine in. Inspired by Pump Street Bakery’s “Ziplock” bags, I went in search of something similar and found some rather cool food safe gold ziplock pouches that worked out at just 20p each.
As a chocolate consumer, I always appreciate some kind of resealable packaging, as I rarely eat a whole bar in one go. As a chocolate maker, I wanted something a little different. And with the addition of some labels printed on my home printer, I think I came up with something that’s both practical and attractive.

Have A Go!
I have thoroughly enjoyed my bean-to-bar journey, and it’s something that I plan to continue and develop. I have registered with the local council so I can sell the bars that I produce, and from the new year you’ll be able to buy some of my experiments on the web site.
For me, part of the joy is knowing that every batch is different, and I can make a maximum of 25-30 bars in a single batch. If you buy one, you’ll be getting something very unique.
More to the point though, I’d love to encourage more of you to have a go at making bean-to-bar chocolate yourselves. The equipment and ingredients are all now readily available and affordable. So whether it’s for a future chocolate making business or just a bit of fun in the kitchen, get in there and start making your own chocolate!
If you need any help, are interested in ordering a grinder or ingredients, or if you want to try one of my first bars, please get in touch. You can email me at dom@chocablog.com or just fill out this contact form.
Finally, I’d like to say a big thank you to just a few of the people who have helped me to figure this all out, including (but not limited to) Duffy Sheardown, Pablo Spaul at Forever Cacao, Sophie Jewett at York Cocoa House, Chris Brennan at Pump Street Bakery, Hazel Lee, Paul A Young, Marc Demarquette, Paul Wayne Gregory and the team at HB Ingredients.
Happy chocolate making!
Information
- Filed under bean to bar, chocolate making.
This post has come at such the right time! I’ve been following your pictures on Instagram and your progress. I’m really interested in bean to bar chocolate and love my cocoa runners parcels. I’ve set my birthday bucket list for the next year to make my own bar. So thanks for the great guidance. The grinding part concerned me as I don’t really have any kit that would be suitable but the grinder seems fairly reasonable. Thanks again and will be using this as my guide into the wonderful world of bean to bar chocolate!
Rachel (FoodNerd)
http://www.foodnerd4life.com
Congrats, Dom! How exciting to be making your own bean-to-bar chocolate! Thx for sharing the process with us. You’ve done a great job in spelling it out, step by step. Happy Holidays to you! I hope your Christmas includes lots of amazing chocolate.
Having tasted a few of these bars, I want to add a GREAT BIG WELL DONE, they’re delicious chocolate (not that I expected any less). So… when will you male banana caramel chocolates with your own chocolate? You KNOW I love those banana caramels!!!
This post couldn’t of cone at a better time! I’ve been wanting to get into making bean to bar chocolate at home for a while and love getting cocoa runners parcels seeing different characteristics of the didffernt beans. Thanks for the tip about the grinder as that was my main concern about how to do that at home. Too late to ask Santa? Thanks for the clear steps and tips, can’t wait to give it a go!
Rachel
http://www.foodnerd4life.com
This was so fascinating! I’ve often wondered what it would take to make bean to bar chocolates at home, but you’ve put together such a great, thorough guide, I feel like I could confidently tackle it in the future. And your bars are completely gorgeous!
Wow. This has inspired me, thank you! I’m waiting for HB to get the wet grinder back in stock
I am quite nervous for tempering though!!!!!
Congratulations Dom!! This is the best and beatifully blog about Bean to Bar chocolate. I share with you the opinión about in a close future bean to bar small companies could became as interesting as small wine makers. We live in México, and we are developing new cacao tree plantations under bioclimatic films/greenhouses looking for a better nutrition content (flavonoids). Currently growing scale models of 6000 trees/Ha under controled UV/PPFD/ RF radiation flows in order not to get phothosynthesis quenching. Please receive our best regards from MEXICO.